|
Line
Boring Tools
|
|||||
 |
|||||
Portable Line Boring Machine Equipment for easy concentric bore repair of holes on Backhoes, Dozers, Endloaders, Scrapper Hitches, Tractors, Excavators, Cranes, machine frames, etc - using a magnetic drill press.


|
Customer photo shows our 40" long boring bar reboring 2 holes in line on a large bucket. The mag drill is held by our weld-on safety base in case of power failure. |
All you need is our line boring kit, a magnetic drill, a welder, a grinder and you can do it if you have the patience to carefully set up the equipment, manipulate speed, feed, depth of cut and choice of cutter. |
Q125,
Q150, Q175 Line Boring Systems - with drill adapter to hold a mag
drill:
Engineered
by American Machine Tools since 2001 with Unlimited Free American
Tech Support! Dont be fooled by imitations made by international foreigners.
For 25 years our equipment has been the easiest and most economical
way to rebore holes round and concentric again. One year warranty
against defects in American craftsmanship. The Q125S, Q150 and Q175
setups include everything you need for reboring most holes. It is
intended for repairing holes up to 8 inch diameter in heavy construction
equipment such as cranes, backhoes, endloaders, excavators, dozers
and tractors powered by your variable speed magnetic drill press with
a 3/4 inch drill chuck. It can also be used to rebore holes in machinery
frames, steel mill ladles, bridge support pivots, etc. Our 1.500 inch
diameter and 1.750" diameter chrome boring bars hold standard
1/2" square shank carbide lathe machine cutting tools. Our 1.250"
diameter boring bars hold standard 3/8" square shank carbide lathe
machine cutting tools. We also have bore welders and add-on kits to
rebore very small holes. Scroll way down to read our line boring instructions.
The bearing that is built into our Adapter Base bearing will hold the boring shaft load to prevent overloading the bearings in your magnetic drill. Since 2014 we add extra mounting holes to allow an extra flange bearing to be bolted directly underneath. The Adapter Base also clamps your magnetic drill in position in case of sudden power failure. A jacking screw is provided for positioning. Approved by Milwaukee Tool Company Engineers for use with their magnetic drill press. Available in 2 lengths depending upon what is the length of your magnetic base. If you dont own a big enough magnetic drill press, you can buy a powerful Milwaukee 4206 or Champion AC120 or an economical modified Chinese made magnetic drill press from us.
Our American made boring bars are made from hard chrome plated induction hardened high tensile strength alloy steel to last a lifetime. The hard chrome plating means you do not need to sand or oil your boring shaft regularly to prevent rust. The chrome is so hard it prevents scratches or scars on your shaft. The chrome also makes removing weld splatter super easy. That is why we make only chrome plated boring shafts. No maintenance required. We also can supply .875, 1.00, 1.25 1.50 and 1.75 diameter boring bars separately. Prices do not include shipping cost. Most equipment is in stock and ships in a few days. Scroll down to see all our different size kits, photos, videos, instructions and equipment options at the bottom.
ENDORSED BY PROFESSIONALS!: "I just completed a job with the setup I purchased. It worked absolutely flawless. Great machine. Wish I would have bought this years ago. Very accurate. Want to do .001 cut and it does it with no issues. Bit positioner is a game changer. Bore measuring tool is amazing. Glad I spent the money and bought this setup from you guys" - Alex Jones - TDF Field Service LLC
CLICK TO READ ENDORSEMENTS of our equipment from other past users
VIDEOS:
Click to see a VIDEO of a Q150 boring a hole with a Champion mag drill
Click to see a customer's VIDEO of our Q150-S Line Boring Machine
Click to see a customer's VIDEO of our Q150-XLS (20 minutes long)
Click to see a customer's VIDEO of our Q150-L Line Boring Equipment
Click to see a customer's VIDEO of our Q150-E Portable Line Boring
Click to see a VIDEO of our Bore Welder mounted to the Q150 Base
|
Chrome
Line Boring Bars Separately: We manufacture our boring bars
on a cnc lathe from hard chrome plated induction hardened high
tensile strength alloy steel. The hard chrome means they dont
rust, set screws in the cones wont hurt the shaft and weld splatter
wont stick. Cutter mounting holes are spaced 5 inches apart.
Beware of competitor's boring bars weakened with too many holes
spaced too close together. We have multiple measuring tools
available that dont need extra holes in your boring shaft to
measure the bearing hole you are boring. Most shaft sizes ship
right from our stock. Available with shanks to fit 3/4"
drill chuck or "weldon" set screw collet. SCROLL WAY DOWN TO BOTTOM TO SEE OPTIONAL EQUIPMENT. |
|
|
Q125-S
Line Boring Kit: $3395.
Click to request more information be sent to you Powered by your magnetic drill with 3/4" drill chuck or collet. Optional
Modified
Chinese Magnetic Drill Press: $595. (Variable
speed, 8" stroke, 1.5 HP) Q125-L is the same but comes with a 60" boring bar + 1 extra bearing, 1 extra bearing plate and 2 extra standoffs: $3795. |
1.25"
diameter x 40" long Boring Bar - chrome plated induction hardened and precision ground 100,000 PSI high tensile strength alloy steel. The chrome resists burrs and scoring to still fit the bearings use after use. Cutting Bit mounting holes are spaced 5 inches apart. 3/4" shank with 3 flats for solid gripping by your drill chuck. 1 Drill Base Adapter with built-in bearing - Important safety device to hold the magnetic drill press in case of power failure. The built-in bearing takes the load of the boring shaft to prevent overloading the internal drill press bearings. Includes mounting hole for BOA-408-AMT bore welder. 2 Self-aligning Bearings - the I.D. of the bearings have a perfect fit between bar and bearings, which insures holes can be bored to near zero TIR runout. 2 Bearing Plates - 1/2 inch thick to reduce vibration when boring. 8 Standoffs - 2 different heights 2 Large Aluminum Centering Cones - for quick concentric alignment of the boring bar and bearings in larger holes. 2 Small Aluminum Centering Cones - for quick concentric alignment of the boring bar and bearings in small holes. 7 Bore Cutting Tools - 3 types of boring, and 1 chamfering. Held in the boring shaft by heavy set screws. 1 Carbide Die Grinder Tool. 1 Dial Caliper - Measures 0" to 8" with dial readout to .001" (digital optional). 1 Telescoping Bore Gage Set - To measure the diameter of your holes. 1 Wood case - now with dolly wheels. 1 American Machine Tools Hat |
|
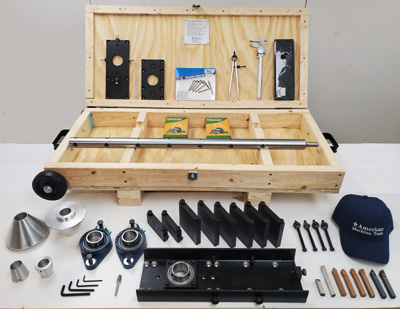
Q150-S
Line Boring Kit: $3395. Powered by your magnetic drill with 3/4" drill chuck. Optional
Milwaukee Portable Magnetic Drill
Press with chuck: $2995. (Variable
speed, 9" stroke. 1.75 HP) |
1.50"
diameter x 40" long Boring Bar - chrome plated induction hardened and precision ground 100,000 PSI high tensile strength alloy steel. The chrome resists burrs and scoring to still fit the bearings use after use. Cutting Bit mounting holes are spaced 5 inches apart. 3/4" shank with 3 flats for solid gripping by your drill chuck. 1 Drill Base Adapter with built-in bearing - Important safety device to hold the magnetic drill press in case of power failure. The built-in bearing takes the load of the boring shaft to prevent overloading the internal drill press bearings. Includes mounting hole for BOA-408-AMT bore welder. 2 Self-aligning Bearings - the I.D. of the bearings have a perfect fit between bar and bearings, which insures holes can be bored to near zero TIR runout. 2 Bearing Plates - 1/2 inch thick to reduce vibration when boring. 1 has positioning screws. 8 Standoffs - of 2 different heights 2 Large Aluminum Centering Cones - for quick concentric alignment of the boring bar and bearings in large holes. 2 Small Aluminum Centering Cones - for quick concentric alignment of the boring bar and bearings in small holes. 8 Bore Cutting Tools - 6 types of boring, 1 facing, 1 chamfering. Held in the boring shaft by heavy set screws. 1 Carbide Die Grinder Tool. 1 Dial Caliper - Measures 0" to 8" with dial readout to .001" (digital optional). 1 Telescoping Bore Gage Set - To measure the diameter of your holes. 1 Wood case - now with dolly wheels. 1 American Machine Tools Hat |
|
Q175-S
Line Boring Kit: $3495. Powered by your magnetic drill with 3/4" drill chuck. Optional
Milwaukee Portable Magnetic Drill
Press with chuck: $2995. (Variable
speed, 9" stroke. 1.75 HP) |
1.75"
diameter x 40" long Boring Bar - chrome plated induction hardened and precision ground 100,000 PSI high tensile strength alloy steel. The chrome resists burrs and scoring to still fit the bearings use after use. Cutting Bit mounting holes are spaced 5 inches apart. 3/4" shank with 3 flats for solid gripping by your drill chuck. 1 Drill Base Adapter with built-in bearing - Important safety device to hold the magnetic drill press in case of power failure. The built-in bearing takes the load of the boring shaft to prevent overloading the internal drill press bearings. Includes mounting hole for BOA-408-AMT bore welder. 2 Self-aligning Bearings - the I.D. of the bearings have a perfect fit between bar and bearings, which insures holes can be bored to near zero TIR runout. 2 Bearing Plates - 1/2 inch thick to reduce vibration when boring. 1 has positioning screws. 8 Standoffs - of 2 different heights 2 Large Aluminum Centering Cones - for quick concentric alignment of the boring bar and bearings in large holes. 2 Small Aluminum Centering Cones - for quick concentric alignment of the boring bar and bearings in small holes. 8 Bore Cutting Tools - 6 types of boring, 1 facing, 1 chamfering. Held in the boring shaft by heavy set screws. 1 Carbide Die Grinder Tool. 1 Dial Caliper - Measures 0" to 8" with dial readout to .001" (digital optional). 1 Telescoping Bore Gage Set - To measure the diameter of your holes. 1 Wood case - now with dolly wheels. 1 American Machine Tools Hat |


|
The standard Q150-L comes complete with everything you need except the mag drill:
1.50" diameter x 54" long Boring Bar - chrome plated
induction hardened and precision ground 100,000 PSI high tensile
strength alloy steel. The chrome resists burrs and scoring
to still fit the bearings use after use. Cutting Bit mounting
holes are spaced 5 inches apart. 3/4 diameter shank with 3 flats
for solid gripping by your mag drill chuck. ***SCROLL
WAY DOWN TO SEE PHOTOS OF OPTIONS*** Optional
Milwaukee Portable Magnetic Drill
Press with chuck: $2995. |
|||
|
The standard Q150-XLS comes complete with everything you need except the mag drill:
1.50" diameter x 72" long Boring Bar - chrome plated
induction hardened and precision ground 100,000 PSI high tensile
strength alloy steel. The chrome resists burrs and scoring
to still fit the bearings use after use. Cutting Bit mounting
holes are spaced 5 inches apart. 3/4 diameter shank with 3 flats
for solid gripping by your mag drill chuck.
***SCROLL WAY DOWN TO SEE PHOTOS OF OPTIONS*** Optional
Milwaukee Portable Magnetic Drill
Press with chuck: $2995. |
|||
|
The standard Q175-XLS comes complete with everything you need except the mag drill:
1.75" diameter x 72" long Boring Bar - chrome plated
induction hardened and precision ground 100,000 PSI high tensile
strength alloy steel. The chrome resists burrs and scoring
to still fit the bearings use after use. Cutting Bit mounting
holes are spaced 5 inches apart. 3/4 diameter shank with 3 flats
for solid gripping by your mag drill chuck.
***SCROLL WAY DOWN TO SEE PHOTOS OF OPTIONS*** Optional
Milwaukee Portable Magnetic Drill
Press with chuck: $2995. |
|||
|
The standard Q150-XLS comes complete with everything you need except the mag drill:
1.75" dia x 96" long Boring Bar - chrome plated induction
hardened and precision ground 100,000 PSI high tensile strength
alloy steel. The chrome resists burrs and scoring to still
fit the bearings use after use. Cutting Bit mounting holes are
spaced 5 inches apart. 3/4 diameter shank with 3 flats for solid
gripping by your mag drill chuck. ***SCROLL
WAY DOWN TO SEE PHOTOS OF OPTIONS*** Optional
Milwaukee Portable Magnetic Drill
Press with chuck: $3295. |
|||
Q150-E5:
$8090.
Rebores holes in-line 1.75 to 5.5 inches (140mm) diameter. Q150-E5
comes with: |
|||
|
Q175-E6:
$8390.
Rebores holes in-line from 2 to 6 inches (150mm) diameter
up to 60 inches apart. Q175-E6
comes with: |
|||
Q175-XE8: $10,995.
includes 1.750 diameter boring shafts x 48 inch long
and 96 inch long for extra strength and extra length. Rebores
holes from 2 inch (50mm) to 8 inch (200mm) diameter in line
at least 80 inches (2 meters) apart. Uses 1/2 inch (12.5mm)
carbide cutters. This setup is too large for most uses. 1.75"
diameter x 96" long Boring Bar
- chrome plated induction hardened and precision ground 100,000
PSI high tensile strength alloy steel. The chrome resists
burrs and scoring to still fit the bearings use after use. Cutting
Bit mounting holes are spaced 5 inches apart. 3/4 shank with
3 flats for solid gripping by the mag drill chuck. ***SCROLL WAY DOWN TO SEE PHOTOS OF OPTIONS***
Optional
Upgrade to Champion Magnetic Drill Press: $700
extra |
|||


 Photo shows customer boring center pin holes. Notice he temporarily welded a plate in position to attach the drill press assembly. |
 Close up photo shows new center pins in newly bored holes. Line boring takes patience but with our tools its not rocket science. |
 Customer photo: Bore repair of center pin holes. |
 Photo shows customer reboring link arm holes. |
 Customer photo: ReBoring close to the ground. |
 Customer photo: Boring holes upside down! |
 Customer is reboring 1 inch holes on a snowplow attachment using the Q88A add-on option. |
 Customer is ReBoring holes on the end of a boom using an extended bearing plate on left side. |
 Even the old magnetic drill shown above can line bore using the Q150 equipment. |
 Very few jobs are too big for the Q150 shown under the red Milwaukee magnetic drill press. |
 If you dont have any cutting oil, you can substitute WD40. But it is important not to weld on top of oil because it will harden the weld. |
 Customer photo shows reboring of center pin holes using 3 bearings. One in the adapter base at top, one down below, and one in the middle. |
 |
 |
 |
 |
|
Photo shows the Q150S with oversize adapter attached to a customers mag drill turning a rough torched hole into a finished 6 inch diameter hole. We have 18" long boring bars. |
Close up photo shows a finished 6 inch diameter hole that was also counterbored 1/16 deep by the Q150S. Hole was originally torch cut by customer then ground and bored out smooth. |
|
Customer photo showing how the bearing mounting plates are connected to standoffs that are tack welded in place. Notice the finished hole in the upper right. |
|


|
Customer's photo shows typical assembly of line bore equipment with Milwaukee magnetic drill. A chain was used to lift magnetic drill press in position. He used 3 bearings to reduce vibration of boring bar. If you look closely, you can just barely see the carbide cutting bit sticking out of the shaft next to the hole on the left side. |
|
 Customer's photo shows another typical assembly of our line boring machine setup with the 72 inch shaft and the Milwaukee magnetic drill press. |
|
 Customer's photo shows a typical setup to rebore 4 holes in line, one after the other.  Photo of loader bucket is courtesy of David Stich Diesel Repair |
|
 Customer's multi-tasking photo shows how he set up the Q150 with Milwaukee magnetic drill to line bore from the right side and bore weld with the BOA-408-AMT from the left side. |
|
 Photo of this loader bucket and arms repair job is courtesy of David Stich Diesel Repair |
|
 |
|
 Photo shows a facing operation done with our carbide facing cutter included with our equipment |

|
BOA-408-AMT
Welding Package $8795.
This bore welder system is for fast smooth perfect spiral welding
in holes from 1.50" (32mm) to 8.0" (204mm) diameter. Connects
to your Wire Feed MIG Welder with free adapter. Does a perfect
spiral weld that is very easy to bore. |
Options
Available: Click to request more Bore Welder info and prices be sent to you |
 |
 |
 |
 |
 |
|


OPTIONS
AVAILABLE for Q150 and Q175 Equipment:
|
Replacement Cutting Tools: •
Brazed carbide boring cutter square: $15.
• Cobalt steel boring-finishing cutter square: $29.
• Brazed carbide Chamfering cutter square: $15.
• Brazed carbide Facing cutter 1/2" square: $24. • Borite LH 1/2" and 3/8" holders with triangle carbide insert: $49. Reusable by changing the triangle carbide insert. Great for reboring holes larger than 3.5" diameter. Available in 90 degree AL8 style or 75 degree BL8 style.
• Borite 3-sided triangle carbide insert #PC300: $15. Price for 1/4", 5/16" and 3/8" Boring Cutters: $15 - $24. Minimum order size is 10 cutters. We recommend C5 (or PC300) carbide for reboring steel plate and C2 carbide for reboring cast steel. HSS-Cobalt works for both. Note: 1/2 inch = 12.5mm |
All of the above cutters are included when you buy a complete Q150 or Q175 setup. All but the facing cutter are included with a Q125 setup. |
|
Optional
Q88A: 0.875" dia x 36" Boring Bar Kit for use with
Q150 or Q175 equipment: $995. |
|
|
Optional
Q100A: 1.000" dia x 40" Boring Bar Kit for use with
Q150 or Q175 equipment: $1095. |
 |
|
Optional
Q125A: 1.250" dia x 40" Boring Bar Kit for use with
Q150 or Q175 equipment: |
 |
|
Optional
21 inch long Boring Shaft: |
 |
|
Optional
Shaft Stroke Extension: $395. |
 |
|
Optional 8 inch Capacity Boring Adapter Kit: $1395. • Large Cutting Tool Adaptor Collar mounts on Q150 or Q175 shaft as shown in the lower photo to hold the cutter out far enough to rebore holes up to 8 inch diameter. The weight of the collar also means it acts a little like a fly wheel. It screws in to the same threaded hole that the set screw uses. The collar also has slots on the face of it so a cutter can be mounted there instead for facing or boring to the bottom of a blind hole. • Also includes 2 extra large diameter positioning cones to fit holes from 5 to 8 inches. The positioning cones have set screws in them to hold the cone in position on the shaft. Our new cones are made from aluminum. • Also includes extra long bearing mounting plates to bridge over holes up to 8 inches diameter instead of only 5.5 inches diameter. One of these same plates is also needed to use our Facing-Sanding Tool. One of these plates will have X-Y positioning screws. Designed and manufactured by American Machine Tools Co. This extra Kit is included with the Q150E8, Q175E8 and Q175XE8. |

 |
|
Adapter
Base for Magnetic Drill Press: $695. |
 |
|
Adjustable
Bearing Mounting Plate for holes up to 6 inch diameter: $299. This mounting plate has 4 adjustment screws to allow the fine adjusting of the position of your flange bearing before you bolt it down. The plate is available in two different sizes; Regular size to bridge over holes up to 6 inch diameter or large size for 8 inch hole capacity. Extended (diving board style for holes up to 6 inch diameter) bolt on bearing mounting plate with a threaded hole for attaching the optional bore welder and adjusting screws for positioning your bearing: $299. One of these is included FREE with a new Q150 & Q175 system. |
|
|
Mounting Plates for bearings (1/2 inch thick):
Bolt
on bearing mounting plates (for holes up to 6" diameter):
$199. each Extra long bolt-on bearing mounting plates (for holes to up to 8 inch diameter) with a threaded hole for attaching the optional bore welder: $249. each. |
|
|
Standoff Riser Blocks (used in pairs):
Threaded
standoffs: 1 x 1 x 4-1/2: $88 each
Threaded standoffs: 3/4 x 2 x 4-1/2: $88 each
Threaded standoffs: 3/4 x 4-1/2 x 4-1/2" tall: $99 ea.
These
are all Black oxide coated to resist rust. Mounting Plates and Standoffs and screws are included with new Q125-S, Q150 & Q175 systems. |
|
|
Standoff Riser Blocks with adjustable height: 3/4 x 4-1/2 x 4-1/2" tall: $195 each. 4-1/2" tall standoffs are needed to remove the cones. If you have uneven surfaces and dont what to shim, one these standoffs are for you. This is a heavy duty alternative to using upside-down hex bolts with washers and nuts. |
 |
|
Flanged
Bushings: A set of 3 Flange Bushings are included with new Q88A, Q100A & Q125A add-on kits. |
 |
|
Small Aluminum Positioning Cones with set screws:
A set of 2 Small Cones are included with new Q88A, Q100A & Q125A add-on kits and Q125, Q150 and Q175 Setups. |
 |
|
Aluminum Positioning Cones with set screws: 1.25"
I.D. x 4" max diameter Cones: $249 each 1.50"
I.D. x 5.5" max diameter Cones: $299 each
1.75" I.D. x 6" max diameter Cones: $299 each A set ot Cones are included with Q125, Q150 & Q175 Setups. |
 |
|
5 to 8 inch Positioning Cones with set screws: 1.50"
I.D. x 5" to 8" Large Diameter Cones: $395 each 1.75"
I.D. x 5" to 8" large diameter Cones: $395 each |
 |
|
Cone Pusher: $195. This device clamps onto your boring shaft next to your positioning cone and uses jacking screws to push tight against the cone. Not normally needed but it can be helpful for pushing your cone against the bore. |
 |
|
Good
2 bolt Flange Bearings:
2 bolt Bearing 1.25" diameter self aligning: $ 59. each We verify the inner diameters of these bearings. |
 |
|
Good 4 bolt Flange Bearings for mounting with upside hex bolts to be tack welded in place. The disadvantage of using bearings without mounting plates and standoffs plates is unwanted vibration. 4
bolt Bearing 1.25" diameter self aligning: $ 69. each
4 bolt Bearing 1.50" diameter self aligning: $ 78. each We verify the inner diameters of these bearings. |
 |
|
Standoff Bolt with Nuts and Washers: $10. Hex Bolts, Nuts and Washers for holding up a bearing or a bearing mounting plate. Just tack weld the upside-down hex head in position and adjust the washers & nuts. Usefull for tack welding to unsven surfaces. Bolt size: 3/8-16 thread x 5" long. 4 normally required. These are not as good as our standoff plates for reducing vibration. |
 |
|
Telescoping Bore Gage Set: $49. 6
piece Telescoping Gauge Set. Measures up to 6 inch (150mm) diameter
holes. Insert the spring loaded prongs into hole. Plungers expand
in hole to be measured. Use the knurled end to lock the setting,
then measure across the ends with the dial caliper included
with your line boring equipment. Self-centering spring-loaded
action with lock, satin chrome finish. Precision-machined hardened
steel anvils with spherical tips; uniform contact pressure.
Comes in plastic pouch for storage. |
 |
|
Inside Caliper: $29. This
manual inside caliper is great for quick easy measurements inside
the holes without removing the boring shaft. Then carefully
remove it and measure across the two prongs with the dial caliper
we give you. This is not reliable for important final measurements.
|
 |
|
Optional Boring Bar mounted Snap Gauge Set to measure holes: $649. The most accurate, reliable and easy way to measure the holes but also our most expensive. These hole size measuring gauges pass thru the boring bar square cutting tool ports. These tools are used to accurately measure the bored hole without removing the boring bar. Very accurate to within .001". The gauges are spring loaded to expand inside the bore. The size is locked with a set screw using a small hex wrench. The gauge is then removed and a caliper is used to accurately measure the length of the gauge. If you will be doing a lot of bore repair you want this.
|
 |
|
Optional
Threaded Measuring Tool Set: $175.
|
 |
|
Optional Digital Inside Bore Gauge: $395. High quality digital caliper capable of measuring the diameter of the hole without removing the boring bar because the jaws are 2-1/4" long to reach around the boring bar but each jaw is 5/16" wide so it will not measure smaller than 5/8" larger than the boring shaft diameter. The digital readout shows inch or mm readings. Includes one battery. Very easy to use if you carefully align the jaws in the hole. |
 |
|
Optional Digital Inside Bore Caliper: $165. Good quality digital caliper capable of measuring the diameter of the hole without removing the boring bar because the jaws are 2" long but each jaw is 1/4" wide so it will not measure smaller than 1/2" larger than the boring shaft diameter. The digital readout has inch or mm readings. Includes two batteries. Very easy to use but you need to carefully align the jaws in the hole. |
 |
| Optional
Precision Dial Indicator Bore Gage: $158. Measues 2.0" - 6.0 inch with 11 anvils • Indicator is in inches • 0.0005" Graduation indicator. • 6 inch probe depth • For measuring hole diameters, tapers, and roundness. • Self centering. • Comes with AGD Group II dial indicator. • Fitted case with anvils index • Accurate way to measure your holes • Time consuming to use. |
 |
|
Optional Cutting Tool Positioner: $245. Two piece gauge that offers an easy way to accurately adjust your cutter height to within .001 inch on the radius. It also holds the cutter while you tighten the set screw in the boring bar against the cutter shank. Set screws onto the cutting tool and adjusts the position up or down by .001" per line of rotation on the outer ring. Works for adjusting the cutter height for holes 2.5" diameter and larger. For holes larger than 2.5" diameter it can be left on the cutter while boring holes if you tape it in place to prevent it from coming loose. We include a hex wrench for the set screw that is inside the inner collar. The easiest way to set and hold your cutter height. Designed and manufactured by American Machine Tools Co. Beware of copies made by foreigners. We recommend this for holes larger than 2.5" diameter. |
|
|
Optional Cutter Positioner: $195. We
invented this device to move your cutter .001 of an inch for
each line of rotation of the knob. It works very similar to
the Cutting Tool Positioner shown above. For shafts 1.50 or
1.75" shafts. How it works: |
 |
|
Optional Digital Cutter Positioner: $298. The velcro strap fits onto any size boring bar. This digital positioner accurately measures the height of the cutter position to within .001" on the radius. Just hold it down firmly against the boring bar with the probe against the cutter tip. Rotate the dial to move the probe and the amount of movement will show on the digital readout. Excellent for setting the cutter height for small holes that are only slightly larger than the boring bar. 2 batteries are included. Much easier than using a dial caliper or dial indicator. Designed and manufactured by American Machine Tools Co. We recommend this with every line boring set. Set
your Cutter Height in the following hole sizes: |
 |
|
Optional Micrometer Cutter Positioner: $248. The velcro strap fits onto any size boring bar. This micrometer cutter positioner accurately measures the height of the cutter position to within .001" on the radius. Just hold it down firmly against the boring bar with the probe against the tip of the cutter. Rotate the micrometer dial to adjust the height of the probe. Great for setting the cutter height for small holes that are only slightly larger than the boring bar.No batteries needed. Much easier than using a dial caliper or dial indicator. Designed and manufactured by American Machine Tools Co. We recommend this or the digital one shown above with every line boring set. For
the following hole sizes: |
 |
|
Optional Adjustable Dial Indicator: $99. If you do not already own an Adjustable Dial Indicator, then buying this option could be a no brainer. Every machine shop should have one. This option works great for accurately adjusting your cutter height within .001 inch. The magnet will attach to our mag drill adapter base, or to one of our bearing mounting plates, or to the boring shaft. The assembly includes: •
Magnet with V-shaped base and on-off switch Decent measuring method for all size holes. |
|
|
Optional Dial Indicator and magnet mounting adapter: $99. This is much better than it sounds. Includes a Dial Indicator with .001 inch increments, and also includes a magnetic mounting adapter. This solid mounting system eliminates the unsteady attachments normally used with a dial indicator when adjusting your cutting tool height. Good measuring method for holes larger than 3" dia. |
 |
|
Optional
Honing Tool Set: $127. |
  |
|
Optional
Set of 2 Slotted Clamping Collars: $189. |
 |
|
Optional Facing-Sanding Tool: $394. Use to sand and face the damaged boss around a hole and make it like new again. The set includes an 8 inch diameter aluminum sanding hub that screws into our Q150 boring shaft and is designed to spin at 350 RPM. This kit also includes 6 adhesive coarse sanding discs for metal removal and 3 adhesive medium sanding discs for metal finishing. Discs are 8 inches diameter. You can add an 8 inch capacity bearing mounting plate if you dont already have one for $199 extra. Designed and manufactured by American Machine Tools Co. |
 |
|
Optional
Shaft Connector Tube: $495. |
 |
|
Milwaukee
Magnetic Drill Press with 3/4 inch chuck to fit the shank of
our line boring shaft:
You will find many uses for this drill, besides line boring. The
Dial to adjust the RPM on the Milwaukee Magnetic Drill Press
goes from 0 to 9: |
|
|
CHAMPION AC120 Magnetic Drill Press with 3/4" chuck, 10" stroke, variable speed. $3995. *
Super Powerful 1700 watt (2.2 HP) Motor Includes:
Optional Accessories (Sold Separately): |
|
|
Voltage Transformer/Regulator: $299. For using our drill press in countries with 220 volts electricity. Fully automatic servo motor-type A.C. voltage transformer and regulator, 3000 watts. It can convert your 220-240 volts 1 phase electricity to 110-120 volts to use the Milwaukee magnetic drill press in countries where 120 volts is not available. This voltage regulator will stabilize a voltage fluctuation between 50v-130v or 160v-245v (+/- 4%). This
is not a reliable long term solution.
|
|
 AL8
AL8 BL8
BL8 Cobalt
 Chamfer
 Facing


INSTRUCTIONS
FOR USING OUR LINE BORE EQUIPMENT:
Clic
para ver las instrucciones lineas maquinado en español
ALWAYS WEAR SAFETY GLASSES ! * ALWAYS KEEP HAIR,
CLOTHING, HANDS AND FINGERS CLEAR!
It helps
to have a 2nd person to assist with the setup, especially when positioning
a long boring bar.
This is intended for reboring pivot holes in heavy equipment such
as cranes, backhoes, endloaders, excavators and tractors powered by
your variable speed magnetic drill with a 3/4 inch [19mm] capacity
drill chuck and a long drill press stroke. If you dont have a big
magnetic drill press, we can sell you one. Our equipment can also
be used to rebore holes on machinery side frames, mounting flanges,
printing press frames, steel mill ladles, bridge pivots, etc. The
words boring bar and shaft mean the same thing. The words standoffs
and riser blocks mean the same thing. Call us for tech support at
1-773-334-5000 if needed Monday to Friday. Read the instructions and
study the assembly drawings we provide with the equipment.
WARNING: Grind off or bore out galled metal before welding, because if you weld on top of galled metal, the weld will absorb carbon from the galled metal and harden too much.
NOTE: You need have the patience to carefully set up the equipment, manipulate speed, feed, depth of cut and choice of cutter.
1)
Insert the boring bar into the holes.
2) When holes get egg shaped there is usually part of the hole that
is not worn out and then you can reference off of whats left of that
part of the original hole diameter. Using two holes to repair, insert
one centering cone against the good side of each worn hole. The further
apart the holes are, the better. Use the smaller aluminum cones for
smaller holes and the larger aluminum cones for larger holes.If you
have an older AMT Line Boring Kit you can use the alignment sleeves
for small holes, just carefully wrap duct tape concentrically around
the outer diameter of each sleeve to match the old diameter of the
hole. It sounds strange but tape works. If the holes are too worn
to find any of the original diameter to position the cone against,
then you can try to center by measuring from the outer boss. Insert
a cutter in one of the square holes a clamp it in place once you have
the boring shaft centered in the hole.
3) Tighten the set screws in the cones. You can hold the cone &
boring bar up against the good side of the hole or use a bungee cord.
4) Bolt a self-aligning flange bearing to a bearing backup plate using
1/2" hex bolts and washers.
5) Slide one bearing & plate on one end of the boring bar and the
drill base adapter (with bearing block attached) onto the other end
the has the shank. Screw the 4.5" riser blocks to bearing plates and
to the channel shaped drill adapter base. Determine where riser blocks
can be tack welded to connect bearing plates to the equipment to be
line-bored. if the surface you are tack welding to is sloped you may
need to use a shim. The 4.5" inch riser blocks are taller than the
cones to allow easy removal and access for cutting tool positioning
and measuring of the hole with the caliper or other measuring tool.
The 2" inch riser blocks can also be used horizontally or vertically
as 4.5" inch risers if you need to get around a boss or a hydraulic
line. Or use 3/8" x 5" hex head bolts upside down with nuts
and washers to hold up the bearing plates. One of the bearing plates
is extra long in case you want to overhang a bearing at the end of
what you are boring. It also has positioning screws to adjust the
bearing position so use it on the far side.
6) Note: The mast of the optional BOA-408-AMT Bore Welder can screw
into a hole on the drill base adapter or into the extra long bearing
plate (instead of using the BOA-408 tack-weld positioning disc). The
mast can also attach to one of our positioning bars that mount under
a bearing bolt.
7) Tack weld all stand-offs to the heavy equipment to be line bored
using many small tack welds to avoid warping. This is especially true
of the standoffs holding the adaptor for the drill. No need to cover
the cones from weld splatter since they are made from aluminum.
8) Undo the cone set screws, slide boring bar part way out and remove
the cones from under the bearing plates.
9) Using the shaft you should add more bearings where possible to
prevent vibration during boring. We recommend one bearing on each
side of every hole you wish to bore otherwise you might have too much
vibration.
10) Make sure the shaft will slide back and forth inside the bearings.
This is because after welding all the standoffs in place, the welding
causes the standoffs to move slightly and the bearings will be seized
on the shaft. Therefore it may be necessary to loosen the bolts that
hold the bearings to the mounting plates. Then tap the boring bar
slightly until you can slide the shaft back and forth because the
welding process may have shifted things enough that the boring shaft
does not want to slide through the bearings. The old Adapter Bases
had a welded on bearing but the new Safety Adapter Base has an adjustable
position bearing to protect the spindle bearing inside the drill.
This is required by Milwaukee to avoid hurting your warranty. The
Milwaukee Drill Motor has 2 mounting positions. 1 with the Drill Chuck
close to the Magnetic Drill Base and 1 with the Drill Chuck farther
from the base. You normally want the Drill Motor bolted in the position
where the Drill Chuck is closer to the Drill Base. Hopefully you have
an adjustable position base on your magnetic drill press. If your
Milwaukee drill has a fixed bas you will need the weld-on extension
for the Channel shaped Adapter Base. Other brands of magnetic drill
presses such as Champion, Fein, Steelmax and Unitec should fit but
tell us the model number before you assume. Most of our boring bars
have a 3/4 inch shank so you will want a magnetic drill with 3/4"
chuck or a 3/4" weld-on collet.
11) Carefully position the magnetic drill in the adapter base using
the jacking screw, and tighten the chuck of your magnetic drill onto
the 3 flats of the shank of the boring bar while supporting the weight
of the mag drill with the screws in the adapter base. It may be helpful
to loosen, adjust and retighten the drill base swivel if your magnetic
drill base has it.
Be
careful not to bend the boring bar shank when installing the magnetic
drill press.
12) Once the drill is properly positioned on the Safety Adapter Base;
tighten the 4 side clamping bolts against the drill magnet base. This
is to help prevent the magnetic drill from injuring you and bending
the shaft in case of sudden electrical power failure, such as blown
fuse, circuit breaker, or someone trips over your extension cord.
The same 4 bolts can be used to position your magnetic drill base
if your drill press does not have a "swivel base".
13) Insert one of the standard lathe machine cutting tools we provide
into the boring bar. Set screw the cutter in position to the proper
height. For adjusting, it helps to use one of our optional Cutting
Tool Positioners shown on this webpage. Otherwise you can use the
dial caliper to measure from the tip of the cutter to the back side
of the boring bar (see photo). You can also adjust your cutter position
with a dial indicator. Then adjust the cutter out by the amount of
change you set the caliper jaw for. Then tighten the set screw in
the boring bar. Do not attempt to cut more than 1/32" [.78mm]
off the diameter per pass thru. Less if the hole is large or if the
hole was welded.
 Photo shows caliper measuring height of carbide cutter.
14) If you are boring thru weld, spray cutting fluid/oil often. If
you cant find any, WD40 will still work, but beware that cutting oils
will leave an oil residue. This matters if you bore before you weld.
You should remove oil residue before any welding to avoid oil hardening
the weld.
15) CHOOSE YOU CUTTER: The cobalt steel cutters are great for removing
high spots, or the first pass in a welded hole or for finishing because
it will not break but it will get dull fast so use a fine grinding
wheel to carefully sharpen it. The left hand brazed carbide tools
are for boring clockwise. A carbide chamfering cutter is also included.
Q150 and Q175 line boring kits will also include a facing cutter.
The Borite holder with the carbide triangle insert is good for boring
larger holes. The cutters with the tilted carbide are less likely
to break. Consider honing the last .001" or .002" with coarse
honing stones to prevent from boring too big
16) Begin cutting at low RPMs. The boring
bar shank has a one year warranty for cutting up to 1/32" (1/64
per side) with each pass. Cut
less in hard welded holes or if your speed and feed are wrong. Try
using the carbide tool bits at low RPMs (100 rpm for 8" dia [200mm],
160 max rpm for 5" dia [125mm], 225 max rpm for 3.5" dia [87mm], 400
rpm max for 2" dia[50mm]). If the cutting tool is fighting hard, apply
less feed pressure, adjust the RPMs, dont cut so deep, to make the
carbide cutting tools last longer. Check often to make sure the drill
chuck is still tight on the shank. Vibration can loosen it. Also make
sure you have a bearing located next to each hole to be bored. Do
not install more than one cutter in the shaft at a time because you
will overload the drill or the shank of the boring bar and that is
not covered under the one year warranty.
ALWAYS WEAR SAFETY GLASSES ! * ALWAYS KEEP HAIR,
CLOTHING, HANDS AND FINGERS CLEAR!
Do not rush. There is no substitute for using
caution and common sense.
There are usually three options to repair pivot holes on heavy
equipment:
17 - Method A) Holes can be welded and then bored back to the original
specs. Unless you purchase a Bore Welder such as the BOA-408-AMT this
is time consuming because it requires a lot of welding but this is
the long lasting tradional method. Original Spec size is the hole
diameter specified by the manufacturer (such as Caterpillar) to fit
the pivot shaft, or if there is supposed to be a bushing, then spec
size is the hole sized to press fit the bushing. Grind off or bore
out galled metal first, because if you weld on top of galled metal,
the weld will absorb carbon from the galled metal and harden too much
and you will waste many cutters and a lot of time trying to rebore
the hard weld in the hole. Same advice goes for removing old grease
and oil since they can oil harden the weld. Make sure you use
the correct weld rod/wire for reboring with carbide cutting bits.
6011 rod is easier to machine than 7018 but wears faster. Consider
7014. For wire use 70S6 or substitute 70S2. If welding in cast steel
then use a soft weld because it will harden and be hard to bore. If
boring cast steel make sure to use C2 carbide instead of the C5 we
give you. Or use the cobalt steel cutter. In welded holes it may help
to first bore with the HSS cobalt steel cutter (instead of brittle
carbide) to remove the high spots from hand welding. But you should
use a die grinder to grind smooth any high spots from the welds first.
We provide a carbide die grinder tool with a 1/4" shank.
17 - Method B) Holes can be bored larger than spec size, and then
a sleeve can be press fit or welded into the hole so that the I.D.
is the original hole size (we recommend at least 1/2" diameter
larger for holes 2" to 4", 3/4" diameter larger for
holes 4" to 6"). This method only works if there is a lot
of extra room. The advantages of this method are no welding and when
the sleeve wears out you might be able to just replace the sleeve
without reboring.
17 - Method C) Line bore so that an oversize bushing can be installed
if there was a bushing before. Then when the holes become worn out
again simply replace the bushing with a new one. An oversize bushing
can maybe be purchased from the manufacturer (such as Caterpillar)
or are easily made on a metal working lathe.
Heat treating the bushing will make it last much longer. Original
Spec size is the original hole diameter specified by the manufacturer
(such as Caterpillar) to fit the outer diameter of the pivot shaft,
or if there is supposed to be a bushing, then spec size is the hole
sized to press fit the outer diameter of the bushing that the shaft
fits into. Check with the manufacturer for original specifications.
Oversize bushings can be purchased from a heavy equipment dealer or
sometimes an industrial bearing supplier such as Motion Industries
or the website www.ebushing.com. If your holes are not too worn and
an oversize bushing is available, then you can just bore to fit the
new larger outer diameter of the bushing. You can freeze some bushings
overnight (or use nitrogen) and slip the bushing into a heated hole
in the morning for an easy press fit into a hole. Caterpillar usually
suggests a press fit of .001" per inch of diameter which equals .002"
for a 2 inch hole, etc. This will seem excessive if you do not have
a hydraulic pusher to force the bearing into the hole. Beware that
the bushing I.D. does not collapse in too much or you will need to
bore or hone the I.D. to fit the pin.
18) Stop to measure the hole after each pass through and adjust your
cutter as specified above in paragraph 12. You will likely need to
sharpen or switch cutters at least once (if it did not break). To
measure the hole, use the telescoping bore gauge set or the dial caliper
we give you. The small inside caliper we provide is good for checking
your progress but is not accurate to measure a final diameter. The
optional digital inside bore gauge, snap gauge set or adjustable threaded
measuring tools allow you to measure the bore without removing the
boring bar. The best way to get the most exact finish is to hone the
last .001 or .002 inch (see photo). This also reduces the risk of
accidentally boring too much. A hone with 80 grit or 100 grit honing
stones is good for this. But 220 grit stones will take all day. Scroll
down below to see more about this option.
Photo
of Honing Tool
19) When holes are finish sized, remove the Magnetic drill and all
bearing mounting plates but leave bearings bolted on tight until you
are sure that the holes are perfect. Do not remove the standoffs yet.
The flat head screws in the bearing plates go into countersunk screw
holes that are designed for easy re-assembly back together in the
exact same positions if you tighten them down 90 percent of the way
and then tighten the screws the last 10 percent of the way a 1/4 turn
per each per screw until they are gradually all tight on the standoffs.
20) When you are sure that the holes are perfect carefully use a torch
and hand grinder to remove bearing standoff plates for future use
or leave them on until you are absolutely sure you are done. It is
best to remove the standoffs only after you are sure the holes are
perfect just in case you want to reassemble the equipment and line
bore one last pass through the holes.
21) If you are careful you should use about 1 or 2 carbide cutters
per hole. Welded holes are hard on cutters. Carbide is hard enough
to cut weld but also brittle so it can chip or break easy. Consider
starting each hole with the plain cobalt-steel cutter to clean out
the rough/high spots before using a carbide cutter. The plain cobalt-steel
cutters dont chip or break, they just get dull quickly but they are
easy to sharpen and easy to use when you are starting out.
22) Our standard Q125 equipment can bore up to 4" diameter , the Q150
can bore up to 5.5" diameter, and 6" for the Q175 but be
aware that extending the cutting tool bit out very far increases unwanted
vibration (tool chatter). If you get a lot of vibration then you should
read our webpage How to
Reduce Cutting Tool Chatter. To reduce cutter vibration in holes
3.5 to 6 inches [87 to 150mm] you can buy the optional slotted clamping
collar set. To bore holes larger than 5 inches, it is better to use
the optional oversize boring adapter which allows hole boring up to
8 inches. The boring adapter slides on the boring bar and is designed
to be screwed into one of the threaded holes that normally hold a
set screw. The cutting bit can then be used inside the adapter to
bore up to 8" diameter. The optional adapter kit comes with cones
that taper from 5" to 8" diameter and longer bearing mounting
plates to bridge over 8" holes.
NOTE: The carbide cutter tips can be modified or sharpened with a
green silicon grinding wheel or diamond grinding wheel mounted on
a bench/pedestal grinder. Grinding the relief angle of the carbide
further back can help reduce cutting tool chatter. The cobalt steel
cutters can be sharpened on any stationary grinding wheel. All the
cutting bits shipped with the line boring equipment are full length
stock size, so that each tool is capable of cutting to its maximum
diameter. To bore holes smaller than 3.5" diameter, cut the shank
of a cutting tool bit with a hack saw or cutoff wheel. To bore holes
smaller than 2", you may need to grind back some of the cutting
tool head so that it can fit further down into the square tool hole
on the boring shaft. Our Q150 and Q175 equipment uses standard 1/2"
square lathe carbide cutting tools. Our Q125 uses 3/8". We provide
indexable tool holders with triangle carbide inserts, carbide boring
cutters, cobalt steel boring cutters that dont break, carbide chamfering
cutter, and carbide facing cutter that faces a circular path about
5/8" wide and can be used to face multiple concentric paths.
Works best with a shaft collar to stop against a bearing to insure
the facing depth is the same. You could also consider using a portable
belt sander for surface facing or our optional facing-sanding disc
that mounts on the boring shaft. The facing cutter does not fit the
1.250" boring bar in the Q125 line boring kit.
Need to cut a retaining ring groove? Try a crude method to
cut snap ring grooves. Grind the tip of a cobalt steel cutter to match
the width of the groove you want to cut. Mount a 3/4" set screw
collar on your cutter and use a spring with 3/4" ID under it
to push outward against the collar. Push the cutter down against the
spring against the boring bar while you position the cutter to where
you want the groove. Tighten a bearing set screw against the boring
bar to hold the shaft in position. Then release the cutter and use
slow rpms to cut the groove. This method is a very crude way to cut
a retaining ring groove but it can work for holes at least 4 inches
diameter.
Buyers are encouraged to call our office if telephone tech support
is needed. 1-773-334-5000.
Copyright©American Machine Tools Company-All rights reserved.
ALWAYS WEAR SAFETY GLASSES ! * ALWAYS KEEP HAIR,
CLOTHING, HANDS AND FINGERS CLEAR!
Click
for TROUBLESHOOTING: HOW TO REDUCE CUTTING TOOL CHATTER
Click to see a VIDEO of a Q150 boring a hole with a Champion mag drill
Click to see a customer's VIDEO of our Q150-S Line Boring Machine
Click to see a customer's VIDEO of our Q150-XLS (20 minutes long)
Click to see a customer's VIDEO of our Q150-L Line Boring Equipment
Click to see a customer's VIDEO of our Q150-E Portable Line Boring
Click for American Machine Tools Company Homepage
American
Machine Tools Corp.
75
Chancellor Drive
Roselle IL 60172 USA
1-773-334-5000
Click to EMAIL US
American Machine Tools Co.
All rights reserved
Offers from American Machine Tools Corporation include include Terms and Conditions shown on our website.
Liability is strictly limited to those warranties of fitness for purpose and safety as provided by the manufacturer.
Products and Logos in this website are trademarks or registered trademarks of their respective companies or mark holders.